In this Spectral School tutorial, we introduce some of the most common optical microscopy terms and techniques, including upright and inverted microscopes, reflected and transmitted illumination modes, and brightfield and darkfield contrast mechanisms, and discuss their applicability with respect to different research areas.
An important consideration when choosing a microscope is the location of the objective lens relative to the sample. In an upright microscope, the objective is located above the sample, whereas in an inverted it is below. Despite differences in construction and appearance, they have the same ability to image the sample and are designed to work best with different sample types.
Upright microscopes are used to visualise samples, with the surface of interest facing upward towards an objective lens that is located above the stage. Upright microscopes can be used to image most sample types and can support slides, well plates, and specialised temperature, pressure, or electrochemical stages. There are, however, two circumstances in which this configuration is not suitable, these are when the sample is too large to fit underneath the objective and when sample access is required from above during imaging. In both cases, an inverted microscope would be required.

Figure 1. Upright and inverted microscope configurations showing the orientation of the objective relative to the stage and sample.
In an inverted configuration, the objective is located underneath the stage facing upwards towards the sample. Here, the surface of interest on the sample must face downwards towards the objective, which means that at least this side of the sample must be flat. One example where an inverted microscope is better suited is in live cell imaging because this application makes use of stage-top incubators where cells sink to the bottom of the sample chamber and access is required from above for the exchange of liquid media.
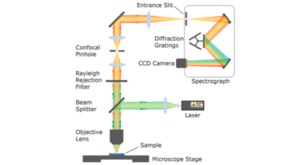
Since a range of samples with widely varying optical properties, from opaque semiconductor chips to semi-transparent tissue cultures, can be observed with a microscope, most modern microscopes enable the user to illuminate the sample in both reflection and transmission modes depending on the specific application, Figure 2. Note that this schematic illustrates an upright microscope and that both illumination modes are also available on inverse microscope frames.

Figure 2. Upright microscope with reflected (red) and transmitted (blue) illumination modes.
Reflected illumination, represented by the red optical path in Figure 2, is considered the best mode for visualising any opaque sample that light is unable to fully penetrate such as semiconductor wafers, polymers, paint, paper, metal, and pharmaceuticals. When a sample is viewed using reflected illumination, light is directed onto the surface of the sample through the objective, and it then re-enters the objective after being reflected off the sample. Upon re-entering the objective, the light is directed into a camera for visualisation of the sample.

Figure 3. Reflected and transmitted illumination of a thin segment of fatty liver tissue fixed on a microscope slide.
When very thin and transparent samples are imaged, such as cells or tissue cultures fixed on glass slides, transmitted illumination is the preferred technique. Transmitted illumination, represented by the blue optical path in Figure 2, directs light through the specimen and into the objective, allowing for better observation of a transparent sample’s morphology. In transmission mode, since the incoming light is not directed through a focusing objective like in reflection mode, a condenser located on the opposite side of the stage from the objective is used to gather the light from the transmission lamp and concentrate it into a cone that illuminates the sample. In microscopes that have both illumination modes available, the direction of illumination light is altered by pressing a switch on the frame. Figure 3 shows an example of a sample where transmitted illumination gives better contrast to visualise the sample than reflected.
There are two main contrast modes in optical microscopy, brightfield and darkfield. In the reflected brightfield mode shown in Figure 4, light is reflected into the centre of the objective via a half-silvered mirror. In reflected darkfield, a light stop is engaged, and the mirror is changed to a full silvered ring mirror that causes the illuminating beam to be directed down the edges of the objective.

Figure 4. Differences between reflected brightfield and reflected darkfield within the microscope.
At the sample, the two techniques differ primarily in the angle at which the illuminating beam is incident; generally, the brightfield geometry involves illumination from an acute angle between 45 and 90 degrees from the horizontal plane of the sample, whereas the darkfield geometry involves illumination from an oblique angle between 0 and 45 degrees, Figure 5. In brightfield microscopy, the acute angle light will primarily be reflected back into the objective lens if it is not absorbed. This means that absorbing features will appear dark against a bright background. Due to the oblique incident angle in darkfield illumination, the light is typically not reflected into the objective lens, resulting in a dark background. Instead, darkfield is employed to detect defects and/or edges in the sample, which cause the oblique incident ray to be scattered into the objective.

Figure 5. A) Differences in the incident angle of brightfield and darkfield and B) the detection of defect scattered light in darkfield.
Darkfield contrast requires specialised optics, for the reflected darkfield (as shown in Figure 4), a specialised darkfield objective and nosepiece are required. Darkfield transmission is also possible and for that, a darkfield condenser is required. Figure 6 shows an example of a sample, consisting of various diatoms fixed on a glass microscope slide, in which darkfield illumination provides better contrast than brightfield. It can be seen in the darkfield image that the edges and fine structure of the diatoms that scatter light into the objective contrast very well against the background, and that the improvement in contrast over brightfield is significant.

Figure 6. Observation of diatoms fixed on a glass microscope slide using brightfield and darkfield.
In this Spectral School tutorial, we discussed some of the most common optical microscopy terms and techniques, such as brightfield microscopy, and how they can all be used to optimally visualise various sample types prior to performing spectroscopic analysis. This is an important consideration in experiments that utilise techniques that merge optical microscopy with spectroscopy because it allows the user to be sure of sample alignment, and it enables them to find interesting features on the sample prior to chemical imaging.