Transient absorption (flash photolysis) is a powerful tool to understand many photochemical properties and reactions, from measuring the energy levels and lifetimes of excited singlet and triplet states, to measuring electron and energy transfer rates of paired molecular systems, and even photocatalysis intermediates and products. The Edinburgh Instruments LP980 Transient Absorption Spectrometer is ideally suited for photo-generated excited state lifetimes and spectra from nanoseconds to seconds, and is the world’s only transient absorption spectrometer to feature a pulsed flashlamp as a high-intensity, ultra-stable probe source, and a dual detector measurement mode offering both an ICCD camera for time-gated transient spectra and a PMT for kinetic transient lifetimes.
 Figure 1: The Edinburgh Instruments LP980 Spectrometer.
To ensure the highest level of sensitivity in any transient absorption measurement, it is imperative that first, the probe beam (lamp) is optimally aligned to the input of the monochromator or spectrograph so that as much light as possible reaches the detectors. Then, that the pump beam (laser) is overlapping the probe beam in the sample to get the most transient signal. This document is written to show our customers how to properly align the LP980 Transient Absorption Spectrometer. Your Edinburgh Instruments Engineer will teach you how to do this during the installation, but we are providing this guide as a quick reference.
Before getting started, you will require a set of metric Allen (hex) wrenches, appropriate laser safety goggles, and a lab-mate; they will be needed to help you over-ride the laser-safety interlocks for final adjustments.
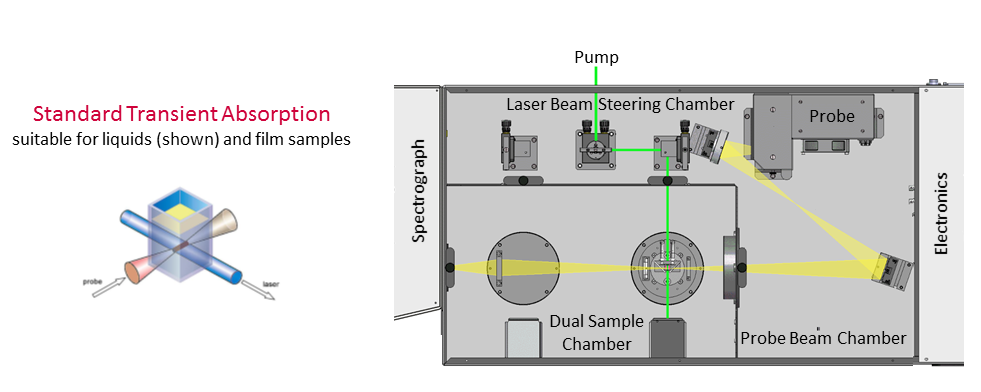 Figure 2: The goal of this document is to optimise the alignment of (i) the probe beam (lamp) into the monochromator, and (ii) align the laser to the probe beam.
Your LP980 Spectrometer and laser should be warmed up and ready for use. The laser (pump) beam will be aligned using a sample in Step 2; we recommend tris(bipyridine)ruthenium(II) chloride, [Ru(bpy)3]2+, dissolved in DI water for its well-known and strong excited state absorptions, and its ability to be excited at common laser wavelengths. The laser should already be roughly aligned into the sample chamber such that the beam goes through the hole in the cuvette sample holder (Figure 3). Either 355 nm, 532 nm, or 450 nm laser excitation wavelengths will work for [Ru(bpy)3]2+, with a laser power between 4 – 8 mJ per pulse. The [Ru(bpy)3]2+ concentration should be approximately 0.2 OD at the excitation wavelength. The collection optic before monochromator should be secured using the screws.
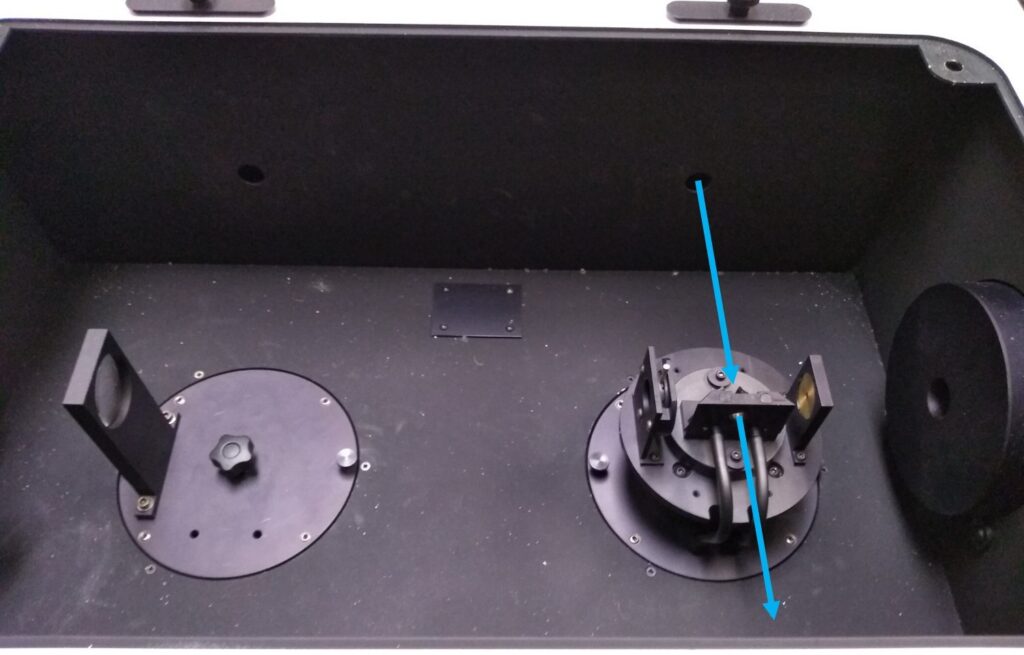
Figure 3: Before starting, the laser should be roughly aligned such that is passes through the cuvette sample holder’s back-end hole. Please contact your Edinburgh Instruments engineer for any questions.
Step 1: Probe Beam (Lamp) Alignment
Once you and your lab-mate are ready to begin, run L900 software and make sure everything starts normally. You will only need to use the PMT detector for these alignments. On the back of the PMT detector box, please set the PMT Bias Voltage Dial to ‘7’, and also ensure the impedance selector is in High Bandwidth Mode. There should not be a sample present in the chamber, and the iris slider should be set in the middle position (handle vertical). The sample chamber lid and laser lids should be closed, however, you will need the lid for the probe (lamp) area off.
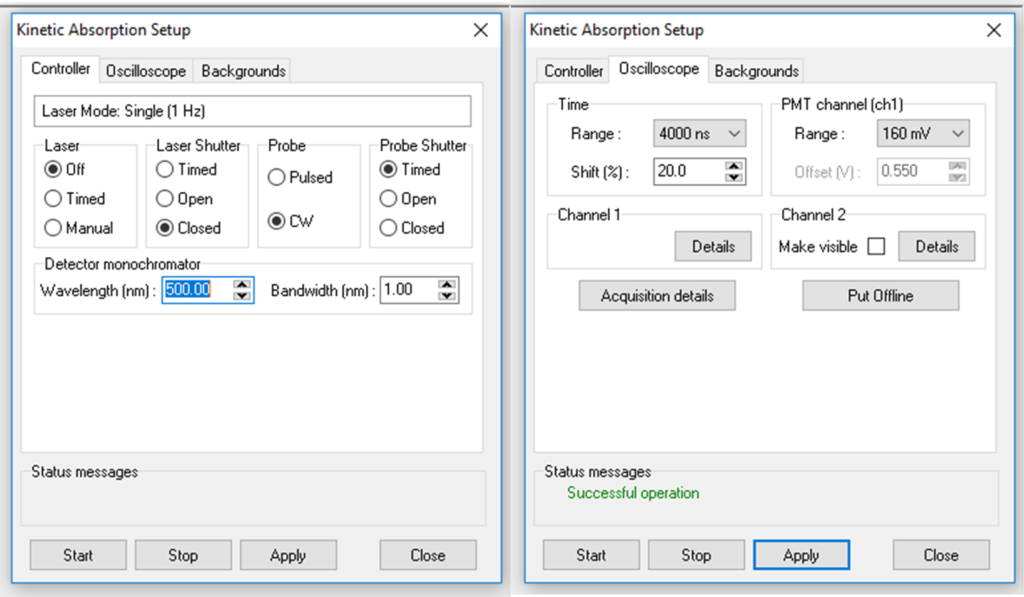
Figure 4: Kinetic absorption Setup settings for probe beam alignment.
Click on the kinetic absorption button and launch the setup window (Figure 4). In the controller tab, set; laser = off, laser shutter = closed, probe = CW, probe shutter = timed, wavelength = 500 nm, and bandwidth = 1 nm. In the oscilloscope window, set time range = 4000 ns, voltage = 160 mV, shift = 20%. Do not place a sample, and set the iris next to the cuvette holder in the middle position (little handle vertical).
Click Apply and then Start; you will see the probe shutter opening and closing and zero signal. Here, please ask your lab mate to override the interlocks on the lamp’s chamber by pressing on the two silver buttons on the lid’s edge. At this point, you should see some signal on the trace, typically between 20 – 80 mV.
Using your metric Allen keys, you will now align the focus mirror to achieve the highest possible signal. First, “unlock” the mirror by loosening the locking screws; these have a little lock symbol next to them (Figure 5). Then, while watching the signal in real-time, turn the alignment screws to achieve the highest possible voltage while your lab-mate continues to hold the interlocks; this range is typically 30 – 100 mV. If no signal is seen, check that the lamp light is focused on the slit entering the monochromator and adjust the mirror coarsely so that light is entering the monochromator, then resume fine alignment as noted above.
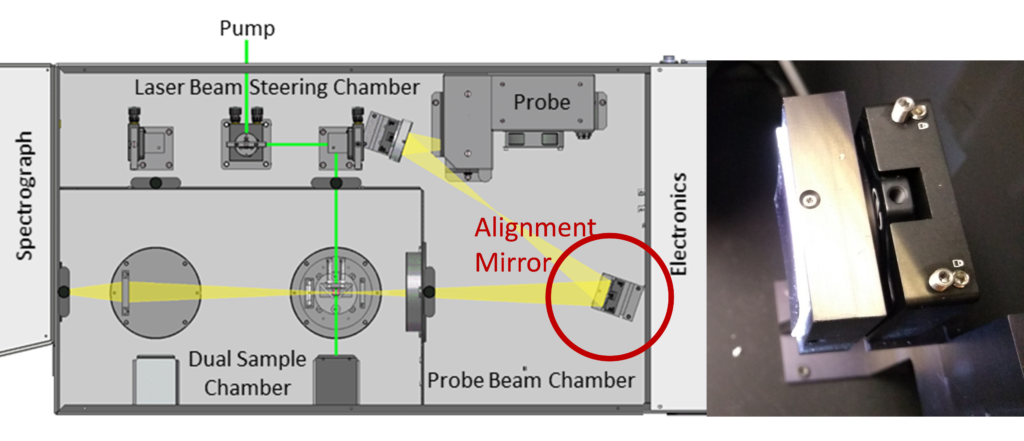
Figure 5: The position of the alignment mirror to optimise signal. Notice the lock symbols; these screws must be loosened before using the alignment screws on the top of the mirror holder.
Once you achieve the highest signal, re-lock the mirror by gently turning the locking screws until you feel a slight catch, replace the lid, and ensure the signal is still optimised. Note the voltage (mV) achieved so you have a baseline for future alignments and when changing the lamp bulb. You are now ready to align the laser to the probe beam.
Step 2: Pump Beam (Laser) Alignment
Before starting the laser alignment procedure, please place your sample, ideally [Ru(bpy)3]2+ dissolved in water in a 1 cm cuvette at an appropriate concentration for the pump excitation wavelength you will use.
Click on the kinetic absorption button and launch the setup window again. In the controller tab, set; laser = timed, laser shutter = closed, probe = pulsed, probe shutter = timed, and wavelength = 370 nm, and start the bandwidth = 1 nm (Figure 6). In the oscilloscope window, set time range = 4000 ns, voltage = 160 mV, shift = 20%. Leave the iris next to the cuvette holder in the middle position (little handle vertical).
Remove the lid to the laser steering optics and put on appropriate laser safety eyewear for both you and your lab-mate. At this point, ask your lab-mate to override the two interlock buttons where the lid sits for this chamber, and place all other lids on the system.
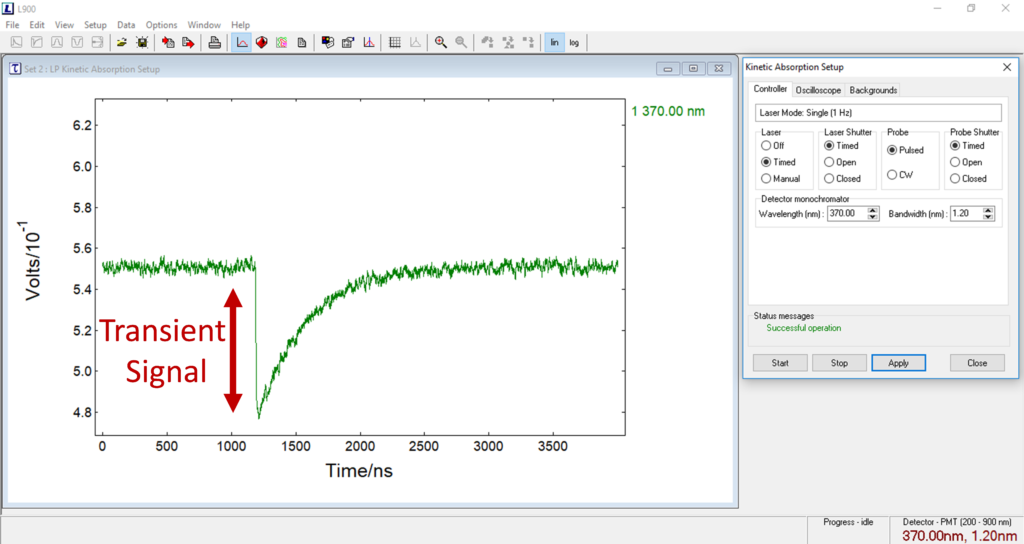
Figure 6: For best results of alignment, use a sample that has a strong transient signal that is easy to measure, in this case, [Ru(bpy)3]2+.
Depending how your pump beam is injected into the sample chamber will determine what to do next. If your laser beam goes straight through the chamber without using any of the steering prisms, then you will use the prism closest to the sample for minor X-Y adjustments. If your laser beam utilises the internal steering prisms, we recommend ensuring the beam goes through the center of the optics, and then you will make small adjustments of the prism closest to the sample. Click Apply and Start; you should now hear the laser running, the shutter opening and closing, and should see some transient data being recorded.
At this point, optimise the bandwidth such that the baseline is approximately 500 mV (Figure 6). Now, slowly adjust the X-Y of the last prism optic before the sample; you should see the transient signal increase or decrease based on the alignment. From here, get the largest transient signal possible, and then stop the measurement. Your system is now aligned and ready for use.